spring pasta with baby artichokes & fresh herbs

There’s nothing better than fresh herbs, pasta and baby artichokes. Besides being delicious, it also means spring has sprung, and all those root vegetables, roasts and stews are bye-bye til next winter.

photo-1


What you’ll need:

1. baby artichokes. For two mouths and some leftovers, I buy five

2. Pasta. I’m loving the fresh pasta from Union Market in Brooklyn right now. Especially the spinach fettuccine. (Sidenote: yes, it will never be as cheap as dried pasta, but it’s a fair and easy amount, around $4.)

3. a couple lemons

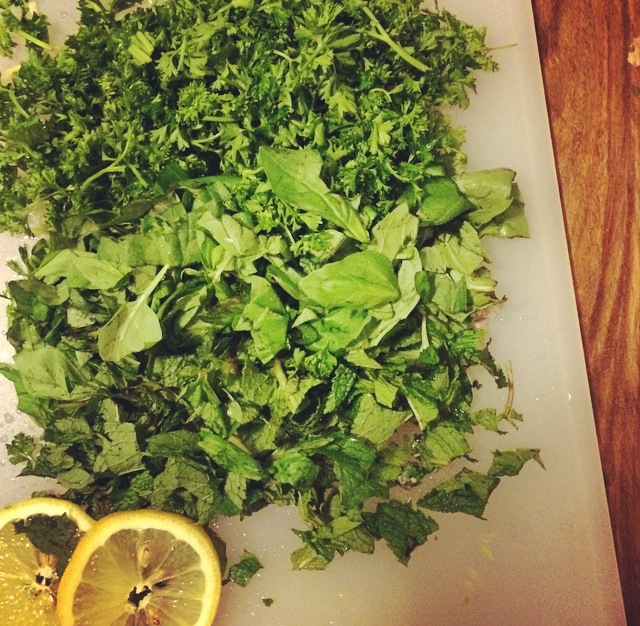
4. a handful of each: mint, basil, parsley

5. a shallot and a few cloves of garlic

6. some white wine – maybe around 1/2 cup?

7. a cup or so of veggie broth

8. olive oil, salt, red pepper chili flakes

9. parmesan — just for the top

photo 5-1

Directions:

1. Start boiling water in your electric hot water boiler. In a large pot, start cooking some large chunks of garlic in a splash of olive oil. Then add the juice of 1 1/2 lemons, add the lemons, then add the boiled water. Refill your electric boiler, let it boil, and add that to the pot, too.

2. While the lemon, garlic and olive oil begin to boil, cut off the stalk part of the artichokes. Then add the artichokes to the boiling water.

photo 4-1


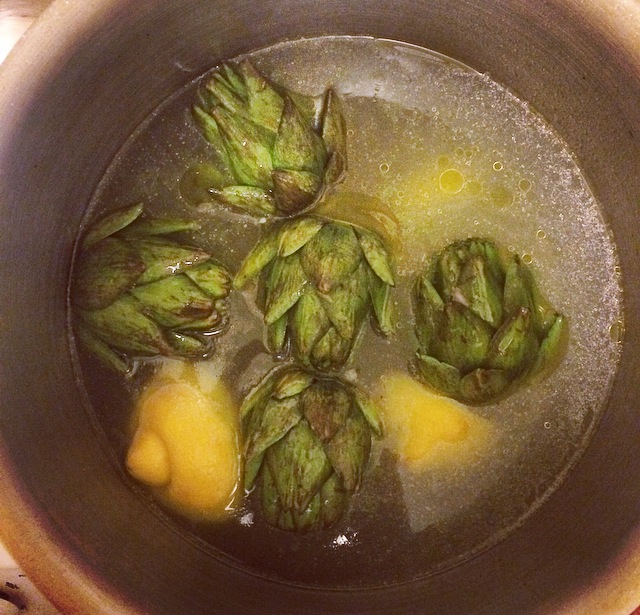
3. The artichokes will take around 16 -20 minutes to cook. You want them to be soft, by not smooshy. Gross. (This is ahead of the game, but please don’t throw out that water! when the chokes finish cooking, you’ll see why).

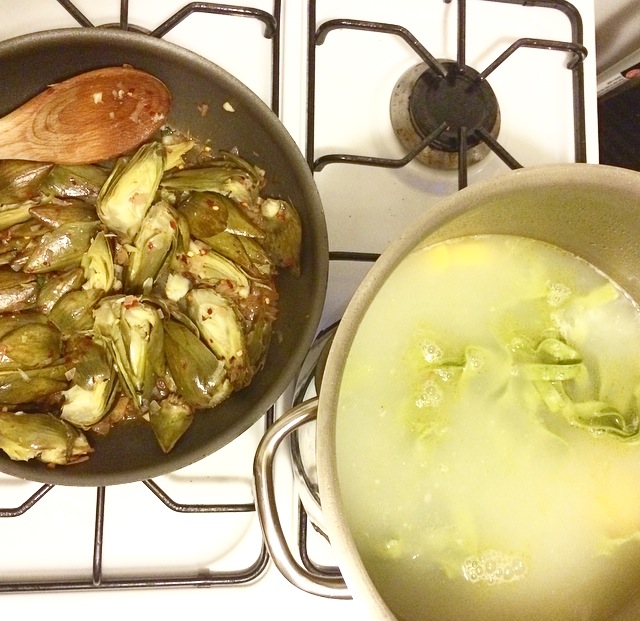
4. While the artis cook, dice up your shallots, another couple large garlic cloves. When the artichokes finish cooking (KEEP THE WATER, just use tongs to remove the chokes), fry up the shallots and garlic in a separate frying pan, along with a little bit of olive oil, around 1 tablespoon. Then add the white wine and veggie broth. Let it simmer.

photo 3-1

5. 1/4 cut the artichokes and add them to the fry pan. Then add chili pepper flakes and a little bit of salt, to your tasting… those flakes will give you a bang, so don’t go crazy, just enough for some good heat. While this cooks a bit, chop up your fresh herbs — basil, parsley and mint.

photo 1-1

6. Now with the water you did not pour out, it should still be boiling, add your pasta. Let it cook in the delicious lemon, garlic, artichoke, olive oil water you have made. Yum. Let the pasta soak up the flavor. It depends on the pasta, but for fresh pasta, it only needs around 3 minutes to cook. Oh my gosh, so damn good.

photo 2-1


7. Pour the pasta out, then poor out the water. Combine the pasta and artichoke-wine sauce. Top it off with the fresh herbs, add some parmesan. You are a winner. Your meat eating counterparts won’t even ask where’s the beef. (that was a horrible joke).  photo-1


spice racks are so last year

This is my spice rack –

photo

It seems organized, consolidated, and just dandy. But good grief, I’m a lady in a studio with absolutely no space. Especially for spices! The cabinets aren’t tall enough to just stack spices, plus let’s be real, I’m way too OCD to have  little containers all over the place. When cooking, you want spices readily available, and ideally in front of you. I also like the beautiful colors of spices… so  let’s get creative, and find a way to show em off, without taking over my (no joke) 2X3 foot kitchen. Sad. Anyway, here’s what I did – test tubes! I chose glass ones with cute corks – ten for $10 on Amazon. (And if you have Prime – please, please, use Prime, it only makes sense – free shipping!) Anyway, I bought these, and made a little paper filter to pour the spices in each tube. I’m storing them in an old spaghetti sauce jar, and currently figuring out a way to hang them on the wall. Or, I might just keep them in the jar. I kept the rest of the spice jars under the sink in a box until they run out – when I need to buy new spices I’ll buy from a shop that sells in bulk. This saves space AND it’s sustainable. I’m also starting to think of ways to use the old spice jars in ways other than bringing salad dressing to work.

Sidenote: If you don’t know the smells of spices, make sure you write their names somewhere on the tubes. Use a Sharpie marker or something. That could get things messy.

Woohoo! So much more space!

photo 4So bright and rich!

photo 1


photo

photoDefinitely fits better in this little kitchen. Love it.

Warmed millet, brussel sprout and carrot salad – with cranberries and walnuts

So this is the other recipe I made today which I found from Vegetarian Times magazine, in their October issue. The salad is super healthy, fiber-ous, filled with great vitamins, protein, and is really tasty. I added and changed a couple things around based on preference and what I had. I actually ended up doubling the recipe, my friend, who served as my sous chef, took home half to eat this week, too. Accompanied with the curried carrot soup, this is going to be a great meal. Filling but light. Looking forward to it. Again, this is vegan!


Millet Salad 

What You’ll Need – (for one batch)

3/4 lb of brussel sprouts

1/2 lb Carrots – I added carrots to the recipe, a nice autumn addition

olive oil

3/4 cup millet

2/3 cup chopped walnuts – you can toast them on top of your oven while the millet cooks

2/3 cup dried cranberries – you can chop or just leave them whole

1/3 cup parsley – chop it up (I added more than the original recipe)

2 Tbs balsamic vinegar – I added a little more, base it off taste

1 Tbs maple syrup – I used agave nectar instead

Juice from 1/2 a large lemon, add a little zest too

Directions

Cut the brussel sprouts in 1/4’s. Cut up the carrots. Place both in a baking pan. Add olive oil, salt and pepper and some garlic. Mix it all up. Bake in 475 deg. oven. Depending on how much you are cooking and what kind of oven you have, cook for about 25 minutes. Check on them for a while, stir em around… I like cooking brussel sprouts until they are a little blackened and crunchy. The carrots should be soft. Mmm this alone is a tasty side dish to any meal.

While the veggies are cooking, put the millet in a frying pan, on medium, and let it cook for 6 minutes. Don’t add anything to the millet, let it brown, crackle a little. After it browns, add 2 cups of water – or veggie broth if you prefer. Let it boil, then turn down the heat, let it simmer, and then cover. Stir occasionally. Like quinoa, the millet will be ready when all of the water is absorbed.


In the meantime, chop up the parsley and toast the walnuts. You’re also going to make the dressing. In a dish, add olive oil, lemon juice, lemon zest, the balsamic vinegar and the agave nectar. Maybe a little pepper. Stir it up, and taste it. I like the combination of the three flavors… lemony, sweet, and vinger. It’s a really nice dressing.

Check on the brussel spouts. Take them out of the oven, and let settle. Check on the millet. Once all of the water is absorbed, the millet will be fluffy. Take it off the stove, put in a bowl, and let it cool down a little.


Now, fold the veggies into the millet. Then add the cranberries, walnuts, and parsley. Fold instead of stir, this will protect the softened vegetables.


Taste it! Maybe you like cranberries – add some more. Maybe you need more protein, add more walnuts. This meal was super inexpensive. Brussel sprouts are in season, cooked carrots are a popular fall dish, and most of the ingredients can be found in the large buckets at stores like Whole Foods – making sure you don’t waste or buy too much of anything. This is especially nice when living in a studio, where space is an issue. I love learning new recipes and making them my own. Like I mentioned in the last post, I think this will pair nicely with the curried carrot soup. I’m going to eat it warm, but it might also be nice cold. With the curried soup and the dressing on the millet, it would be interesting to try adding pan fried tofu to this. maybe cooked it in the lemon and agave nectar. Anyway, hope you try and enjoy it. Also, so nice to have lunch already made to fight your Monday blues. Enjoy!


Carrot Curry Soup. With pistachios. Boom.

Tonight I prepared two recipes I found in Vegetarian Magazine’s October Issue. I received a six month free gift earlier in late summer, and just received the October, November and December issues this week – Ha! Anyway, I went through them and cut out the recipes I was excited about. Today, I made the curried carrot soup with roasted pistachios AND this warm millet and brussel sprout salad. I’ll post that recipe next. I made both recipes for tonight’s dinner,  dinner tomorrow, and lunch on Tuesday (maybe I’ll freeze the rest)… with Thanksgiving on Thursday, I want something light and nutritious so I can eat a disgusting amount of stuffing, turkey, and pie. Not sure in what order. I. Can’t. Wait.

I changed some things around, based on what I had and how it tasted. Let me know your thoughts. Both recipes are vegan.

Curried Carrot Soup – 

What You’ll Need

Bag of carrots – the recipe called for grated, I just bought a bag of baby and chopped them up

2 large leeks – The grocery store ran out of leeks, so I bought a large white onion instead and chopped it up

4 cups of water – I didn’t want my soup that watery, so I only added two cups. (Note: maybe use vegetable broth, low sodium, next time)

handful of roasted pistachios – chop ’em, or don’t. they are a nice crunchy and salty garnish

olive oil

1/4 and 1/8 tsp. baking soda – not sure why the recipe adds this, but maybe it’s a thickening agent?

1/2 tsp. curry powder – what?!! In my humble opinion, that’s definitely not enough curry powder. I think I probably ended up tripling that… so add how much you want based on personal preference. I like spice. I also added cinnamon to mine.

Screw it – add cinnamon. It’s a nice, autumn-y touch. 🙂

Directions-

In a large pot, heat up the olive oil, probably like two splashes of it. Add the baking soda (Note: this feels like a science project) Then add the cut up carrots and onions. BOOM. Just kidding. Stir ’em up, close the pot, and let everything cook for like 15 minutes or less. Stir every couple minutes, and watch for the veggies to soften.

Add 2 cups water and curry powder. Let it cook a little. Then pour the soup into your blender (if you don’t have an immersion blender, ugh, sad face). Blend up, maybe add some black pepper.

Serve with pistachios on top. Maybe some raisins too, if you want something a little sweeter. If you aren’t going veggie, this might be nice with a savory, roasted rosemary chicken. Yum.

Seriously, this soup is SO easy, cheap, in season, and delicious. Carrots are one of the super veggies, spices are good for you system and your soul. And really, who doesn’t like pistachios?

Additionally, cook while listening to Mariah Carey, have football on mute, and you’ll have yourself a golden Sunday.


chickpea curry with cranberry almond quinoa

While I wait impatiently on Election Day, I decided to prepare my favorite Indian dish – a spicy, savory chickpea tomato based curry, and sweet delicious quinoa with cranberries and almonds. Looks pretty tasty, right? It’s not only delicious, but it’s super cheap, and super easy.

Here’s what you’ll need –

For the curry

can of chickpeas

can of chopped tomatoes – I like the fire roasted ones with garlic

a yellow onion

garlic

fresh ginger

a little olive oil – to cook the onions, garlic and ginger

turmeric – a tsp

cumin – a tsp

coriander – a tsp

cayenne pepper – to taste (I made this batch a little too spicy)

garam masala – on top, after it’s cooked

veggie broth – two cups, maybe three depending on how long you cook

For the quinoa

two cups veggie broth

one cup quinoa

handful of cranberries – I prefer to unsweetened ones, but they are sometimes difficult to find

1/4 cup slivered almonds

cinnamon stick

couple bay leaves

Directions

Give yourself about 30-45 minutes to cook. First start on the curry. Chop up the onion, garlic and grate the ginger. Add all of it to a pan with a couple tablespoons of olive oil. Cook it up til the onions soften. About 10 minutes.


Next, and this is the tricky part, open up the cans of tomatoes and chickpeas. Pour em in. Add the veggie broth. Then add the turmeric, coriander, cayenne pepper, and cumin. Stir it up. Ha – I told you, this is a super simple and inexpensive meal. Initially the spices cost a bit, but they last forever.


Cover and stir occasionally. After reaching a boil, turn down the heat, and let it simmer for about 35 minutes. In about 20 mins, start the quinoa. Add the veggie broth, quinoa, cranberries, almonds, cinnamon stick, and bay leaves. Reach a boil, then cover and simmer for about 15 minutes – until the broth is gone, and the quinoa has a white rind around the grain.


A couple notes – I didn’t have cranberries this time, so I substituted currants instead. Turned out ok, but wasn’t as sweet. In fact I added a little Raw Stevia to balance out the cayenne pepper I overdid. I think I’m trippin over the election. In addition, I totally forgot to add the veggie broth to the curry. Fail. It dried up super quick, and the chickpeas weren’t as soft as they should’ve been – it also didn’t take a lot of time for the curry to cook. Kinda gross. So I added a little broth and let it simmer a little more. Much better. I’ve seriously made this dish half a dozen times, and today I screw it up.

Hmmm anything else I forgot? Don’t think so. This dish is served nicely with naan, if you aren’t stressin’ about carbs. It’s also nicely paired with sliced pears in cinnamon and honey… again, a nice cooling taste to add while eating this spice-rich meal. And oh yah – it’s vegan, and pretty healthy in it’s fat-carb-protein ratio! Enjoy!